Building a mechanical keyboard right from scratch can be something that would need a lot of effort on your part. In fact, it should be one of the big steps in the direction of using mechanical keyboards. To assist you in the realm of how to build a mechanical keyboard flawlessly, we thought of helping you out in a step by step instruction set.
Contents
The Components you need in how to build a mechanical keyboard
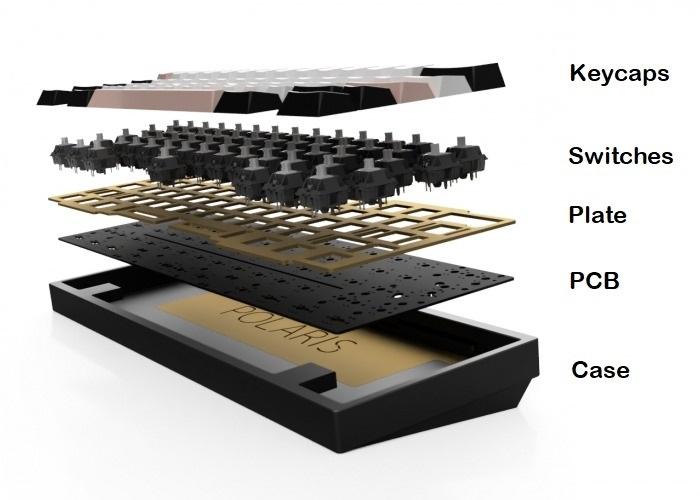
Before you can set out on a journey to find the ways to building a keyboard from scratch, you will need to have access to the following components:
- Case
- PCB
- Switches
- Mounting Plate
- Stabilizers
- Keycaps
You will need to have access to the components based on the parameters such as how you would want to personalize the keyboard. You can pick the options based on your individual requirements and customization expectations.
You may also need to have the right list of tools for working on your custom keyboard

You can pick the keyboard components from Amazon and other online stores as per your preferences.
How to Build a Mechanical Keyboard?
There are several steps involved in building your DIY keyboard. Let us check out the steps involved one by one. We will help you go through the steps one by one by focussing on the components and the actual steps involved in how to assemble the components.
Step 1: Pick the type of keyboard you want to build
That can be the toughest task ever. It can be a tougher task if you are building your first custom mechanical keyboard.
You can figure out the following steps:
- The size of the keyboard you want to build
- The features you want to incorporate
- The time you need for building the keyboard
The size of the keyboard
There are several keyboard sizes and types you can build. You can check out the different sizes and types of the keyboard and decide which size of the keyboard you are looking ahead to build.
The major keyboard sizes you would want to check out would include:
- Full-sized keyboard: This is the most common keyboard option and has been the widely used option ever. However, building a full sized keyboard may not be that easy as it will only be available in pre-built models.
- TenKeyLess keyboard: The TenKeyLess keyboard is one of the most common keyboards and chops off the number keypad. The rest of the keyboard options is equivalent to the full sized keyboard.
- 75% keyboard: The keyboard comes with the same design as the TenKeyLess keyboard, but comes with no navigation cluster.
- 65% keyboard: The 65% keyboard further removes the function keys row and retains a few of the navigational options. This can be the smallest keyboard with dedicated arrow keys.
- 60% Keyboard: This is one of the best keyboards that offer you access to the custom keyboard layout. It has no function row, arrow keys, or navigational cluster. Finding the parts for making the custom keyboard can be a great option.
- 40% keyboard: This is the smallest keyboard ever and perhaps one of the excellent keyboards for most of your requirements. Removing the numeric keys from the 60% keyboard will bring up the 40% keyboard.
The features you want to incorporate in the keyboard
Now that you have finalized the keyboard size, the next step would be to check out the key features you would want to include in your DIY keyboard.
Some of the features you would want to focus on when building your DIY mechanical keyboard kit would include:
- RGB Lighting: In case you are building a keyboard for gaming, you would want to go with a RGB backlighting compatibility. You can pick different keyboard RGB backlighting options that can include per-key lighting, side lighting, and under glow lighting.
- QMK Firmware: In case you want to have programmable keys, the use of QMK firmware should be one of the prime choices for your needs.
- USB port: Picking the right USB port is also much essential and important. It may be a good idea to use a USB type C port which is one of the best standards as of now.
When do you want to complete building the keyboard?
The timeline taken for building the keyboard can prove to be one of the most practical choices. The time taken to build the keyboard will be dependent on how long it takes for you to get the keyboard parts and the time you might have taken to build the keyboard.
It may be a good idea to go with the in-stock parts or even opt for the group buys.
- In-stock parts: This can be one of the fastest options to get access to the best build you can think of. You can simply order them from the online stores and your keyboard is ready to be built.
- Group Buys: This can be a good option if you are looking to build a highly customized keyboard. However, you are likely to need to wait for at least six to nine months.
Step 2: Get the Keyboard Parts for the Keyboard
The next step would be to get the keyboard parts for your keyboard. Depending on the exact needs, you can check out the best shopping requirements. Let us check out the basic requirements for a DIY mechanical keyboard kit.
The PCB
The keyboard PCB is the heart of your keyboard. It is the medium through which your key switches communicate with your computer. Choosing the PCB can be a difficult task, but you can choose the PCB based on the customization options you are looking for. Now that you have chosen the size of your keyboard, choosing the PCB should not be a huge task. Most of the PCBs let you change the position of the keys and key switches.
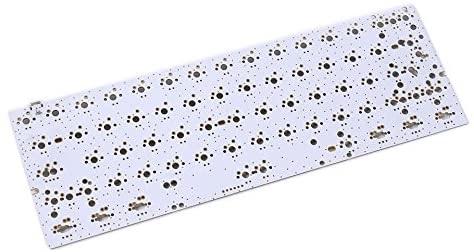
A few of the keyboard PCBs come with RGB backlighting options. You can even choose the option for the pre-soldered RGBs. The next step will be to check if your PCB comes with the soldering option or hot swappable switches. If you are not comfortable with soldering options, it may be a good idea to check out the hot swappable keyboard switches. The PCB should be one of the prominent parts of the custom keyboard kit.
The Case
Once again, the size of the keyboard plays a major role in your choice of the best case for your keyboard. The material of the keyboard case can also be one of the excellent options you would want to give a serious thought to.
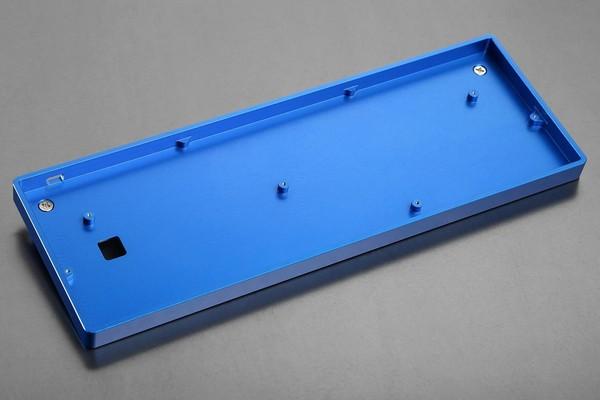
You have four different options in terms of the right cases for your needs:
- Aluminum
- Plastic
- Wood
- Clear Acrylic
Aluminum may be the strongest option for a custom keyboard kit, but it comes with an expensive price tag. The heavyweight of the case can also offer you the stability when handling it. Plastic cases can provide you the best benefits for your buck. They can provide you strength and do not come with any scratches. The cases can come with a few limited sets of colors, while the Black and white cases would be quite popular options.
You also have access to the best wooden cases for your needs. It can also provide you access to a great aesthetics. The last option would be the acrylic cases and they provide you access to a great degree of performance enhancements. It may be a good idea to go with a custom keyboard case for providing a personal touch as well.
The Switches
The switches are what would provide you access to an enhanced and improved performance for your keyboard. You can pick from among the linear, tactile, and clicky switches as per your preferences.
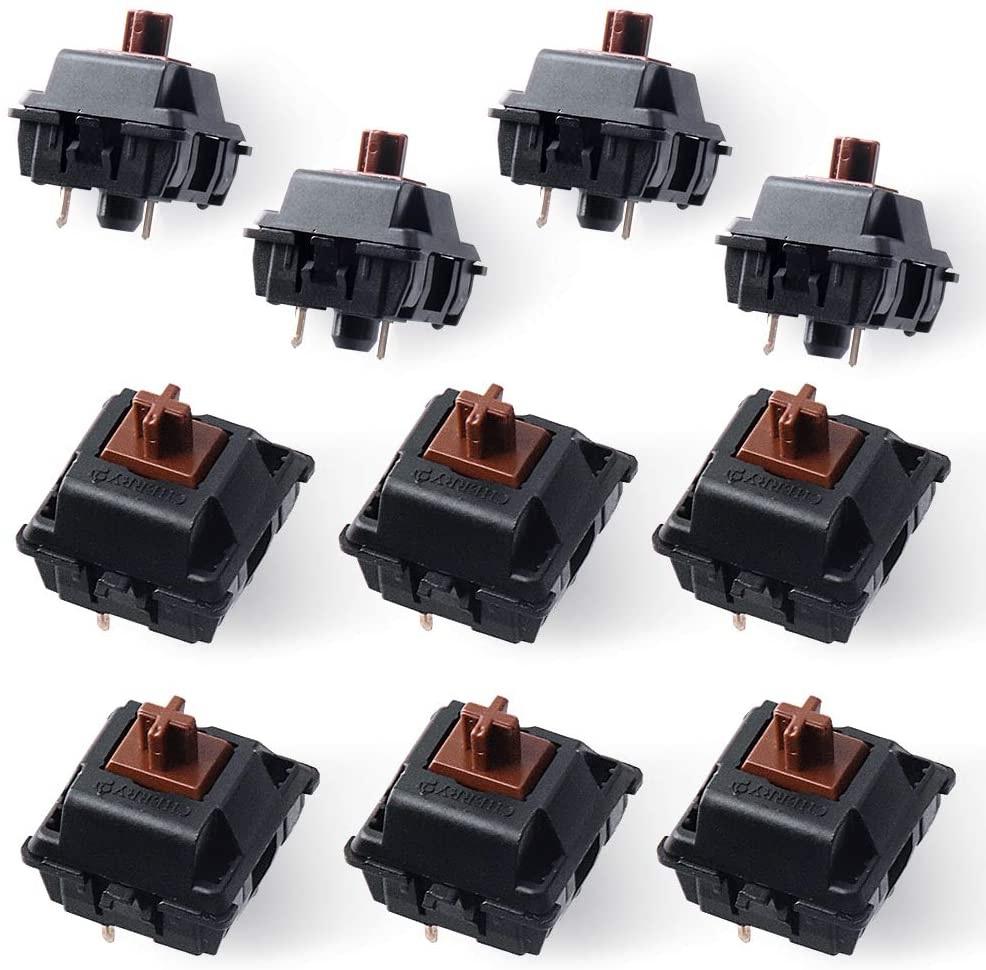
- Linear: Smoother and consistent performance and a quiet noise
- Tactile: A small bump for each of the keystrokes, but moderate noise
- Clicky: A small bump with a keystroke, but a louder clicky noise
As for the switches, you can make a choice between the Cherry MX switches, Romer G Switches, Kailh Switches, or even the Gateron Switches. Each of the switch manufacturers has a considerably good collection of switches that include Cherry MX Blue Switches, Red Switches, and other different options. Likewise, you would also find several switch categories such as Gateron Black or even Kailh Brown switches.
Choice of the key switches finally boils down to the preference of the keystrokes and typing experience you are looking forward to.
The Keycaps
The keycaps are what you see on the keyboard and come with the key legend. This is that part of the keys that you press on for typing. There are several designs available when it comes to the keycaps in terms of the designs, profiles, material, and other parameters.
You can pick between the PBT keycaps and ABS keycaps. Both the types come with their own features and functionalities.
- The PBT keycaps are much preferred as opposed to ABS keycaps because of the durability and lack of key shine
- Profile refers to the shape or looks of the keycap. You can pick the one based on your design parameters. There are two types of profiles available viz Uniform and Sculpted
- The design of the keycaps refers to the color of the keycaps. You can choose the keycap design based on the aesthetics and décor of your desk.
- The method of manufacturing can also be a key factor you would want to give a serious thought to when picking the best keycaps. Some of the methods include dye-sublimation, laser-etched, double-shot, single-shot, and other options.
You can even consider opting for the custom keycaps if you need to.
Plate
The plate is used for mounting of the keyboard. The mounting plate and its choice would be dependent on the case and PCB holes. It can also make the keyboard look great and nice. The plate can be one of the excellent means to give a personal touch to your keyboard.
Stabilizers
The stabilizers are generally overlooked when building a keyboard. They may not be customizable, but you would need them for providing the stability to your keyboard. The stabilizers are used on the longer keys such as Shift, Spacebar, and Enter keys. This will be helpful in preventing the wobbling of the keys.
Step 3: Test the keyboard PCB to make sure that it is working
The first thing you would want to make sure of would be to ensure that the PCB is working. You can perhaps plug it into a PC and then check each of the switches to ensure that it is working. You may use tweezers to ensure that they are working.
Testing the PCB right away for each of the keys can help you do away with the risk of having to begin everything afresh. You can even use this site for checking the PCB.
Step 4: Lubricate Your Switches
The next step would be to lubricate the switches. Now that the switches have not yet been added to the keyboard, you can lube them well. Simply pull out each of the switches and apply the lubricant adequately to the components such as lower housing, spring, stem, and upper housing.
This can be useful and helpful in letting you reduce the scratchiness, smoother keystrokes, and of course, a better noise. Do note that if you are building a clicky keyboard, it is highly recommended to avoid lubing them.
You can check out a few good lubricants for this purpose.
Step 5: Install the stabilizers on the keyboard PCB
The next step would be to install the stabilizers on the PCB. It is always impotent to ensure that you have installed the stabilizers in the correct spaces on the PCB. Since every key does not come with a stabilizer, it may be necessary to install the stabilizer exactly at the place where you want them.
Step 6: Install the switches inside the plate and PCB
The next step will involve installing the switches into the plate and PCB. You can press the switches inside the plate and then let the pins enter the slots inside the PCB. Never forget to place the plate and install the switches both on the plate and the keyboard PCB.
There is a possibility of bending or damaging the pins when installing them in the PCB.
Step 7: Solder the Switches
Once you have fixed the switches in place, the next step would be to solder them. If you are using the hot swappable switches, you would not need to solder the switches. If you are not comfortable in soldering your switches, you may need to opt for the professional switches. The best way would perhaps be to opt for the hot swappable switches. Hot-swappable key switches and PCB can be a great option to help you in how to build a keyboard without soldering.
Once all the switches have been soldered, you can retest the switches on the PCB.
Step 8: Add up foam and rubber feet to the case
Before you can place the PCB into the case, you can simply add the foam and rubber feet to the case. Most of the cases come with the rubber feet. You may need to follow the instructions that came with your case. The foam may be optional and you can avoid it if you do not want to add it up.
Step 9: Install the assembled PCB into the case
The next step will be to install the assembled PCB into the case. The actual steps here may be dependent on the mounting type of the case. You may perhaps simply need to screw in the PCB into the case. Refer to the instructions that came with your case.
Step 10: Install the keycaps
The last step would be to install the keycaps. This can be the easiest step that would sum up building your custom keyboard. Make sure that keycaps exactly go into the place where they are exactly meant to be. Once the keycaps have been installed, your build is complete.
That should complete your keyboard installation. Once the keyboard is ready, you can simply test it on the PC. This should help you complete the task of how to make a custom keyboard without hassles.
The Bottom line
Building a keyboard from scratch may not be an easy task if you are not tech-savvy. However, if you are willing to learn and take risks, how to build a mechanical keyboard can be an easy task. Make sure you are careful enough in following the steps so that there are no issues that may make you start all over again.