When it comes to mechanical keyboards, the Razer Blackwidow keyboard is one of the excellent options that should come to your mind. The RGB backlighting and the macro support are a couple of features that would ideally make it one of the promising options that you would want to go with. However, one of the common things you may come across on the keyboard includes the instances of the keys coming off suddenly. If you are facing any such issues on your keyboard, you need not worry. We will try to find the best options to help you fix the issue of how to put the spacebar back on Razer Blackwidow Keyboard. We will also find the fixes for a host of other keyboard and keys issues on a mechanical keyboard.
Contents
How to Put Spacebar Back on Razer Blackwidow?
As is the case with almost all the other mechanical keyboards, it is possible to take off keycaps from the razer Blackwidow keyboard as well. You can take out virtually any key from a mechanical keyboard and assemble it back on. Irrespective of whether the spacebar key came off on its own or you removed it, it should be pretty important to find how to put the spacebar back on Razer Blackwidow.
It has been observed that while it has been quite easy and simple to put back all the other keys on the razer Blackwidow keyboard, it is extremely hard to put back the spacebar key that easily. Most of the users find it very hard to put back the spacebar key on their razer Blackwidow keyboard. The prime reason that can cause the issue on the Razer Blackwidow keyboard is that it has a metal clip attached to the backside of the spacebar key. The stabiliser bar is useful in registering the correct keypress irrespective of where you have pressed on the spacebar. To put back the spacebar key, you need to install the stabiliser properly.
The first and foremost important factor that you need to be specific about installing the spacebar is to ensure that you have aligned the angle of the spacebar properly. Once that is done, align the stabiliser of your spacebar key properly with the clips on the keyboard. You can use a screwdriver or any similar tool to gently push the stabiliser bar into the clip until you hear a click. The clicking sound should indicate that the stabiliser has been installed correctly.
It may be noticed that you need to install the stabiliser bar on either side one by one. Once it has been installed on one side, repeat the procedure on the other side of the spacebar key. Care should be taken not to exert too much pressure when pushing the stabiliser bar into the clips. If the clips break, your spacebar will stop working forever.
In most circumstances, it is advisable to remove all the keys (or keycaps) from the row above the spacebar. These keys can easily be installed, and you need not worry about removing them. The keys that you can have issues with when installing them are the ones that have stabilisers.
The video here should ideally provide you with a good understanding:
How to Remove Spacebar from Razer Blackwidow Keyboard?
If you have to remove the spacebar key on your Razer Blackwidow keyboard for one or the other reason, it should be pretty easy and simple if you manage to do it correctly and with due care. Ideally speaking it should be much easy to remove the keys and keycaps on any mechanical keyboard. The steps outlined here are almost similar to the steps involved in how to remove the spacebar on mechanical keyboard of any brand or make.
Make sure that the tools you use for removing the spacebar from the keyboard are proper enough and do not tend to damage the keys and stabilisers beneath them. The use of improper tools can make you have a serious issue with your keys and damage it.
You can follow the steps here below to remove spacebar from mechanical keyboard:
- Unplug your keyboard: Unplug the keyboard along with all the accessories from the mains. Since removal of the larger keys such as the spacebar can be challenging; it is essential to keep the keyboard in a comfortable position to help you work properly with it.
- Use keycap pullers at both ends: Since spacebar is the largest key on the keyboard and has stabilisers and clips on both ends, it may be necessary to use two keycap pullers. Insert the keycap puller at either end of the key.
- Pull up the keycap slowly: Pull up the keycap slowly at both ends. Apply equal pressure at both ends. The keycap should come up, and your spacebar should now be removed.
The steps above should be comfortable and easy to follow on any mechanical keyboard. If you do not have two keycap pullers, you can use one keycap puller at one end and make a keycap puller with the help of paper clips.
The video here should provide you with a clear idea of how to make a keycap puller using paper clips.
How to Install Cherry Stabilizers?
Before we can find the right ways to install Cherry stabilisers, it may be essential to learn what a stabiliser is. You may come across several stabilisers, and the availability of different types, styles, sizes, and mods can make it a little difficult to understand and use the stabilisers.
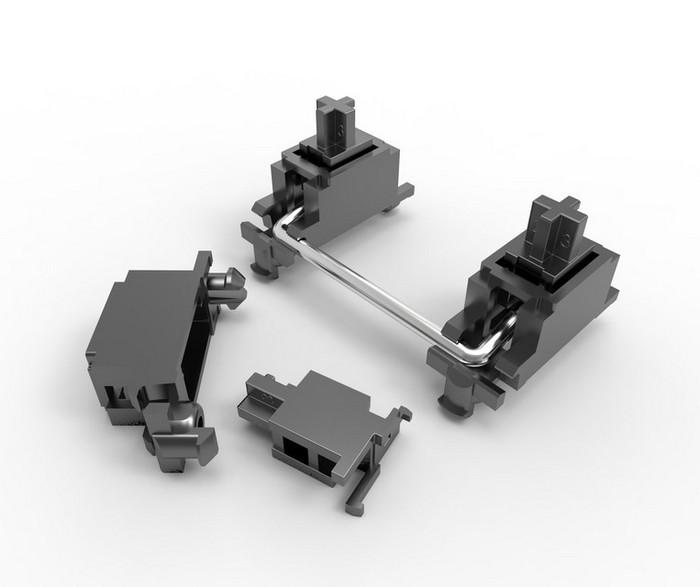
A stabiliser is an essential keyboard component that is placed below the larger keys. The stabilisers are generally found under the spacebar, backspace key, caps lock key and shift keys. These will be helpful in providing you access to a full-fledged protection against the shaking, rattling, and tilting while typing. The stabilisers can be useful and helpful in having the best stable typing and gaming experience.
Coming back to the Cherry style stabilisers, they have been observed to be one of the most commonly used stabilisers. They are quite easy, simple, and good enough to mod, which is one reason why they have been regarded as the right choices for the stabilisers. They also come with several different options in terms of mounting styles, colors, and material types.
The Chery Style stabilisers have a Cherry MX switch stem. That is precisely why they are referred to as Cherry stabilisers.
Here is how you can install Cherry Stabilisers on a mechanical keyboard:
- Unplug the keyboard from the mains. You will also need to remove the other accessories as well.
- Keep the keyboard firmly on the working table or at a place that you can comfortably work with it.
- Remove the keycaps of the keys that surround the key that you are looking to work on. Since we are installing the stabilisers for the spacebar, we will remove the keycaps of the keys on the row above the spacebar
- Install the plastic keyboard clips into the keyboard plate. Make sure that the direction of the clips is properly adjusted. You will need to press with the hook to be pressed in first and then press the other side
- Press in the stabiliser spring in the proper position. You may need to exert a little extra force to insert the spring.
- Check the stabiliser inserts on the keycaps. Press the inserts properly. You should find the plus signed holes on the back of the keycaps.
- Finally, the spring stabiliser needs to be adequately hooked into the keycap inserts. This can be a little difficult step to work with and will need a lot of patience and coordination.
- Then install the keys that you had removed. This should be the most straightforward option as you do not need to work with stabilisers when fixing these keys.
Check out this video to understand it better:
Can I Reverse the Spacebar?
Yes, you can revsere the spacebar on your keyboard, and for that, you have to remove the spacebar, and the stabilisers by following the steps that we discussed earlier in this article. Once they are removed, you simply need to reinstall them. However, you will need to connect them in the opposite direction than the one they were initially in when doing so.
What to do if Razer Blackwidow Spacebar Replacement is Not working?
If you have followed the steps above and still find that the spacebar replacement is not working, it may be due to a wide range of reasons. Let us analyse a few reasons that can cause the error.
The key switch may be damaged and sticky
If that is that is the case with your key switch, you will need to remove the keycap and drop a little rubbing alcohol. Once that is done, you can simply press the key a few times. Once the key has loosened up, it should begin working.
The stabiliser is not installed properly
You might have installed the key stabiliser incorrectly. This will make the key to feel wobbly and unstable. Make sure that you have followed all the steps for inserting the stabilisers properly. The most possible reason can be that the stabiliser clips and inserts are installed backwards. You can try them flipping and retesting it.
The Final Wrap Up
The steps in how to put spacebar back on Razer Blackwidow keyboard can be quite simple and easy to go with. Stabilisers under the keys such as keycaps, clips, inserts, and springs need to be handled properly. Learn how to install them properly and get assured functionality of your spacebar key.